Event can be created from the Calendar menu.
You can create a single instance event, or a recurring event base on your need. Below is the fields description and important note you need to knows to understand better how to create an event.
Fields
| Field Name | Description |
|---|---|
| Title | The title of the event |
| Starts | Event starts time |
| Ends | Event ends time |
| Repeat | Options: Never – single instance event Weekly – Weekly recurring event |
| Location | The location this event will be using |
| Description | A short description of the event |
| Services | Add a service if you want to:
|
| Visibility | Options: Private – Visible only to added stakeholders, and customers. Open – Visible to all stakeholders and customers within a business. Public – Visible to everyone. |
| Show Join | Allow customer to join the event. |
| Required Passes to Join | Number of passes required if you allow customer to join the event. |
Creating a Single Instance Event
Open up the Create Event screen, fill up the basic required field like Title, Starts, and Ends. In the Repeat field, select Never – to repeat. Fill up the other information accordingly like Locations and Description, and click on Create button to save.
Creating a Recurring (Weekly) Event
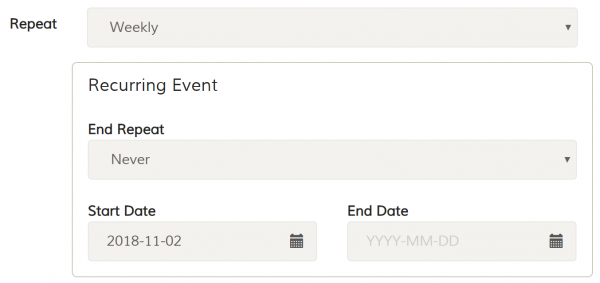
If you provide education service, you might need to create a weekly schedule for your service. Open the Create Event screen, fill up the basic required field like Title, Starts, and Ends. In the Repeat field, select Weekly. A Recurring Event option box will show up below the Repeat field.

End Repeat
If you know the ends of the recurring event, select On Date in End Repeat field and you need to select the end date in the End Date field.
Select Never if you don’t know the end date and the event will be scheduled forever. This option can be edited if one day you would like to end the event. Edit the event, and select On Date in End Repeat and select the end date in End Date field to end the event.
