Malaysia’s e‑Invoice framework allows businesses to consolidate multiple invoices into a single consolidated e‑Invoice for reporting to LHDN’s MyInvois system. Consolidation is commonly done on a monthly basis, and LHDN requires the consolidated e‑Invoice to be submitted within seven (7) calendar days after the end of the month. This guide explains when consolidation is appropriate and how to generate a consolidated e‑Invoice in FeePlus.
📌 When You Should Consolidate Invoices
Under Malaysia’s e‑Invoice framework, you may consolidate invoices when you have non‑validated invoices — meaning the buyer does not require an individual e‑Invoice for each transaction.
LHDN’s guidelines allow suppliers to aggregate multiple transactions for such buyers and submit a monthly consolidated e‑Invoice to IRBM. This consolidated submission must be completed within seven (7) calendar days after the end of the month.
Consolidation is typically used for:
- B2C transactions (Business-to-Consumer)
- Buyers who do not request individual e-Invoices
If a buyer requests an individual e‑Invoice, that invoice must be validated separately and cannot be included in the consolidated submission. FeePlus will automatically flag validated invoice out when you do create the consolidated e-invoice.
🧾 Before You Begin
Before consolidating invoices, ensure the following:
- All invoices for the period are finalized in FeePlus.
- None of the invoices require individual validation for the buyer.
- The invoice group has consolidation enabled in Settings.
- You have selected the correct month and invoice group in the e‑Invois page.
These checks help ensure that your consolidated e‑Invoice is generated smoothly and complies with LHDN requirements.
🛠️ How to Consolidate Invoices in FeePlus
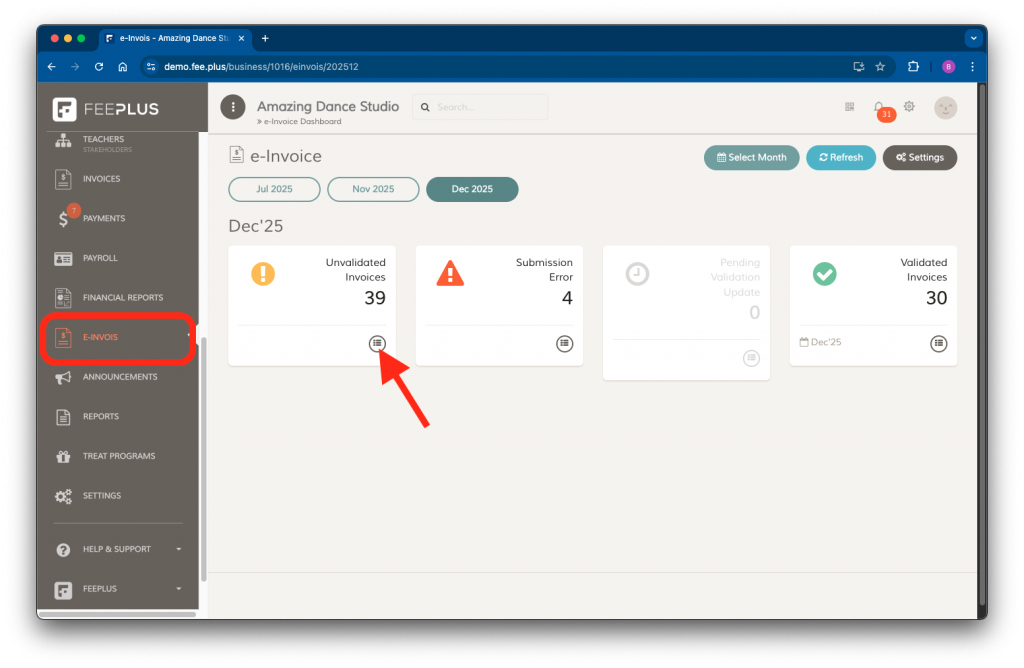
Step 1 — Go to the e-Invois Page
- Open the Admin Console.
- Navigate to e-Invois → Select Month.
- Click the Unvalidated Invoices List button.
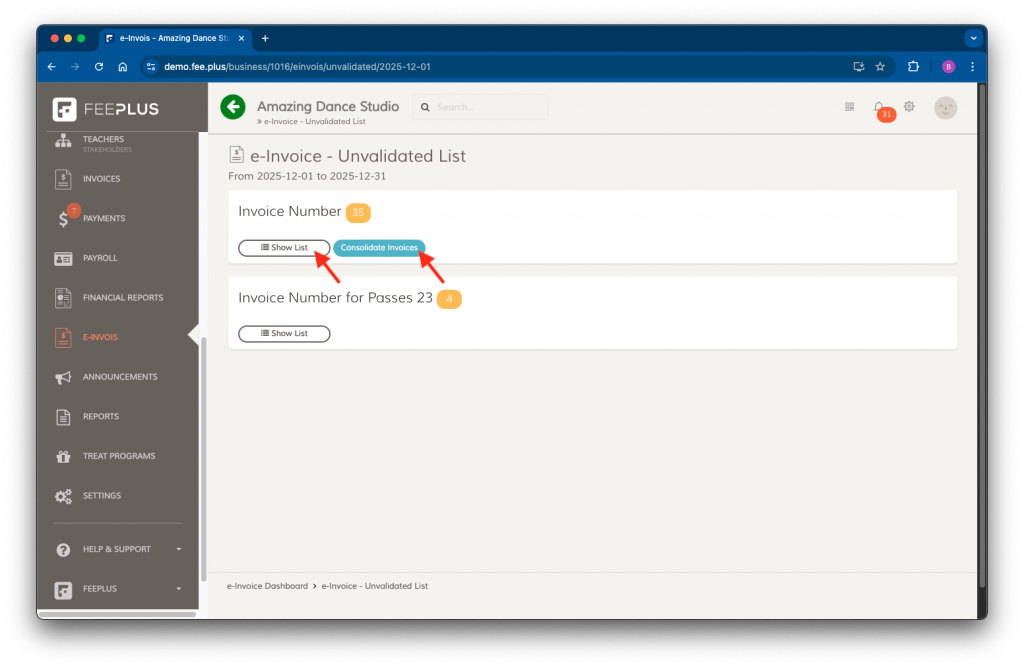
Step 2 — Select the Invoice Group
You can choose to consolidate all invoices under one invoice group for the month, or manually select specific invoices.
- To consolidate all invoices for the month, click Consolidate Invoices.
- To manually select which invoices to consolidate, click Show List.
Note: If you do not see the Consolidate Invoices button, consolidation is not enabled for that invoice group. You can enable this feature in Settings.
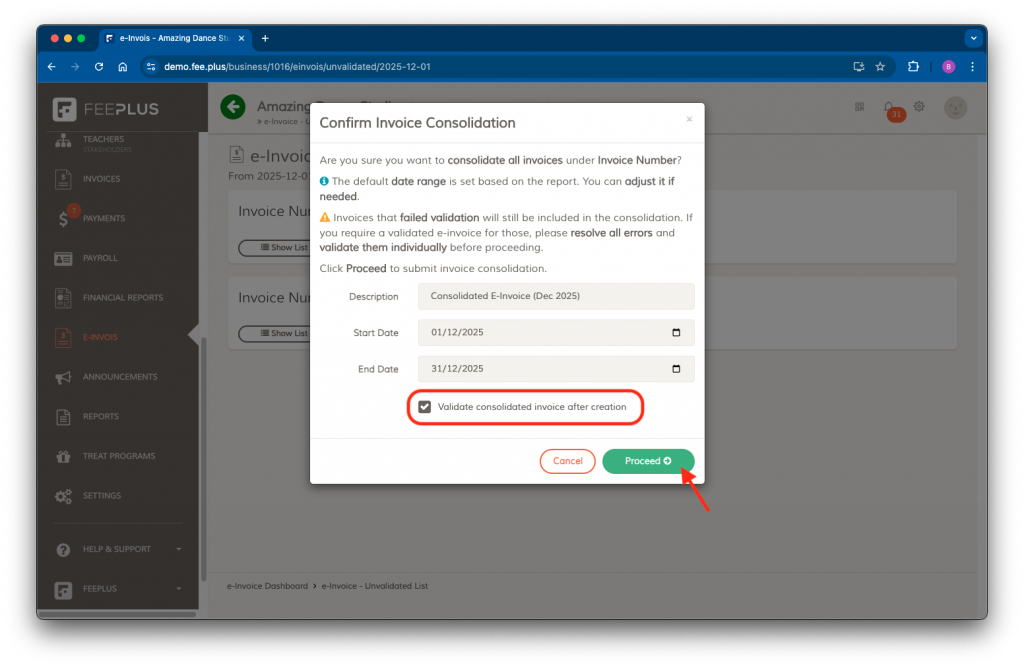
Step 3.1 — Consolidate All Invoices in an Invoice Group
- Click the Consolidate Invoices button.
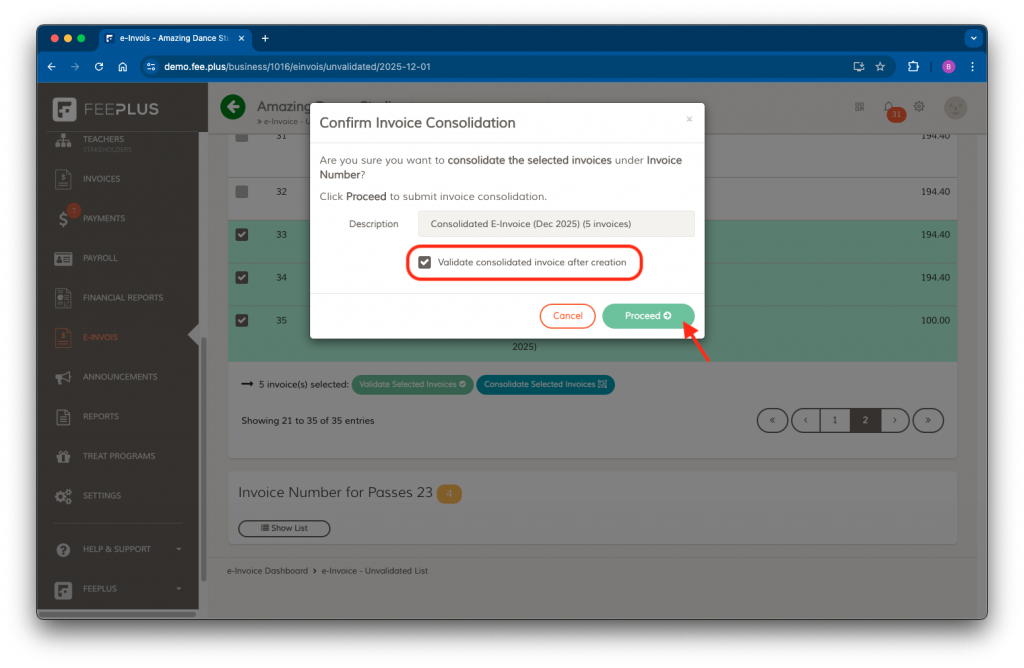
- A confirmation dialog will appear for you to review the description, start date, and end date of the invoices included in the consolidation.
- If you want the consolidated e‑Invoice to be validated automatically after creation, check Validate consolidated invoice after creation.
- Click Proceed to create the consolidated e‑Invoice.
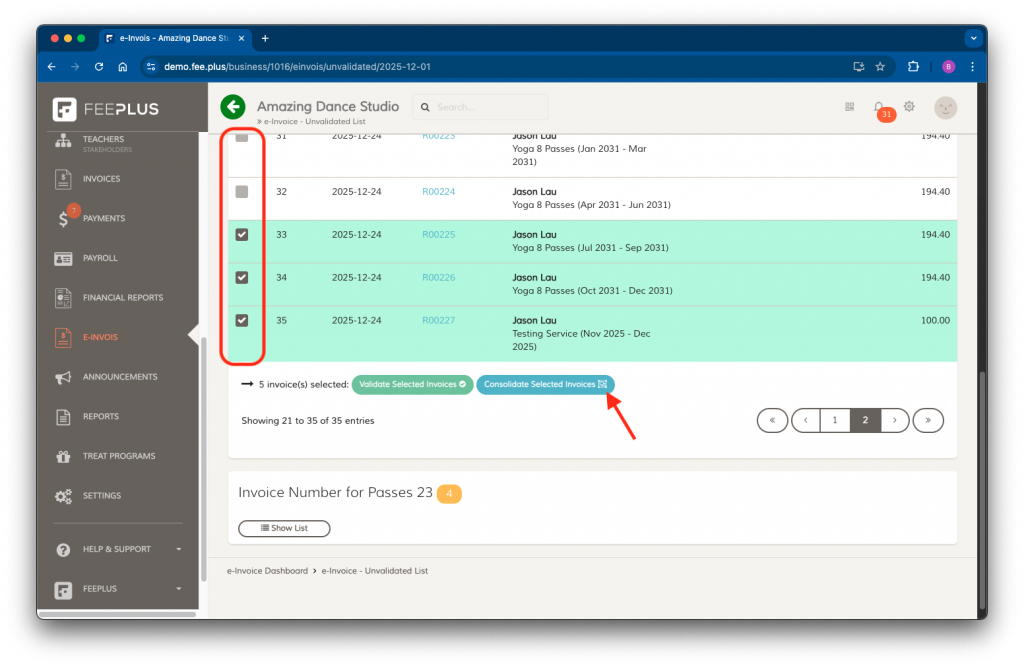
Step 3.2 — Consolidate Specific Invoices in an Invoice Group
- Click the Show List button.
- Tick the checkboxes next to the invoices you want to consolidate.
- Click Consolidate Selected Invoices button.
- A confirmation dialog will appear for you to review the description.
- If you want the consolidated e‑Invoice to be validated automatically after creation, check Validate consolidated invoice after creation.
- Click Proceed to create the consolidated e‑Invoice for the selected invoices.
Step 4 — Generate the Consolidated e‑Invoice
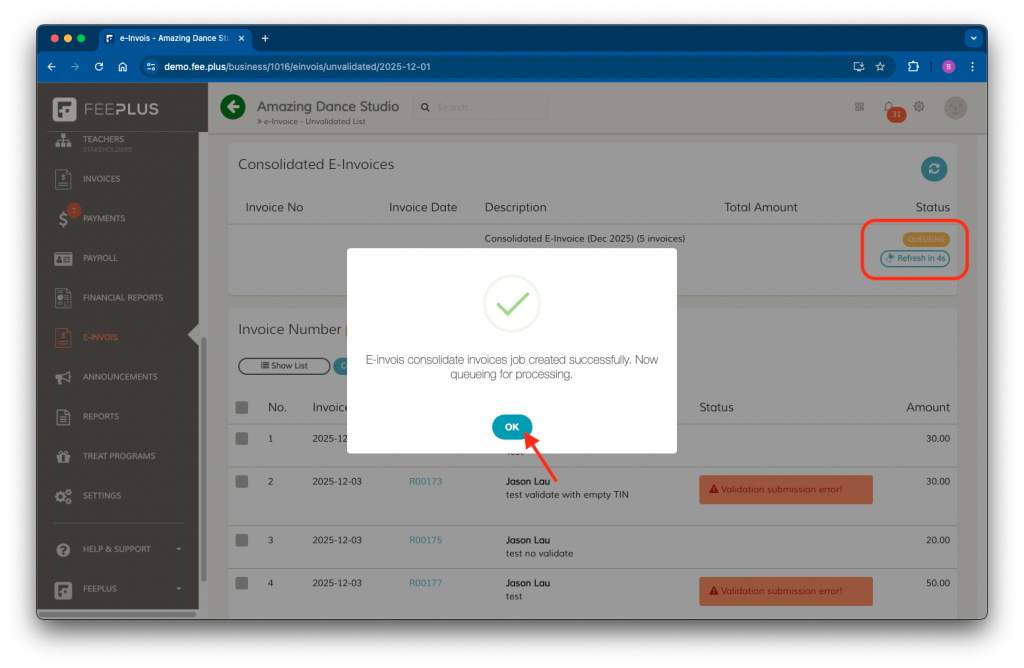
When you create a consolidated e‑Invoice, FeePlus will queue the task in the background. Because consolidated e‑Invoices require additional processing, the system will display a 5‑second countdown and automatically refresh to update the job status.
If you check Validate consolidated invoice after creation, FeePlus will automatically submit the consolidated e‑Invoice for validation as soon as it is created.
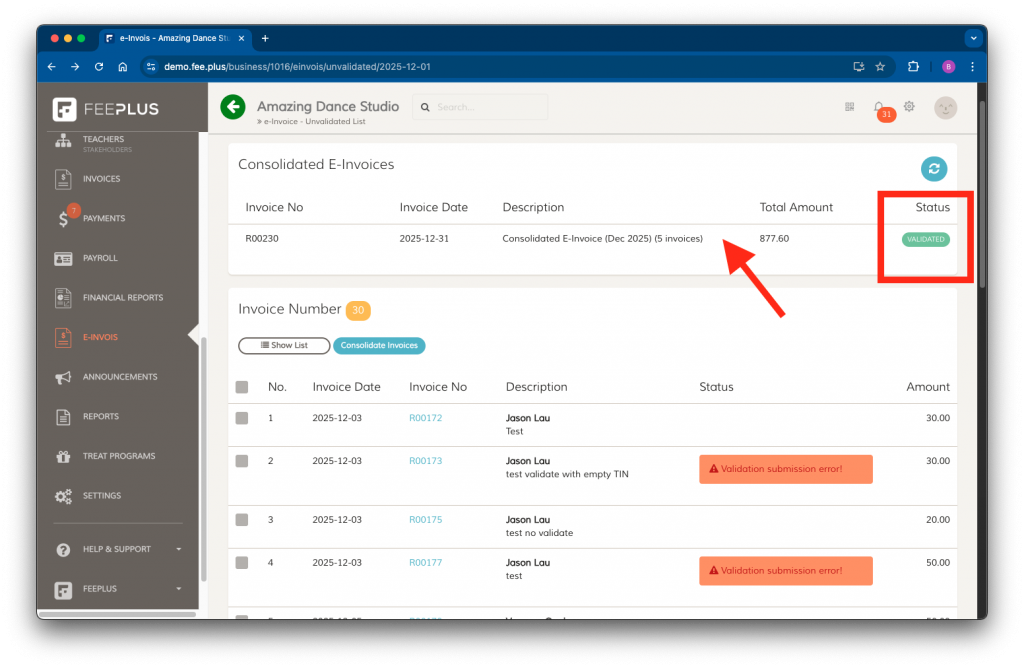
Once the consolidated e‑Invoice has been validated, it will appear in the list. Click the row to open and view the validated document.
After Submitting Your Consolidated e‑Invoice
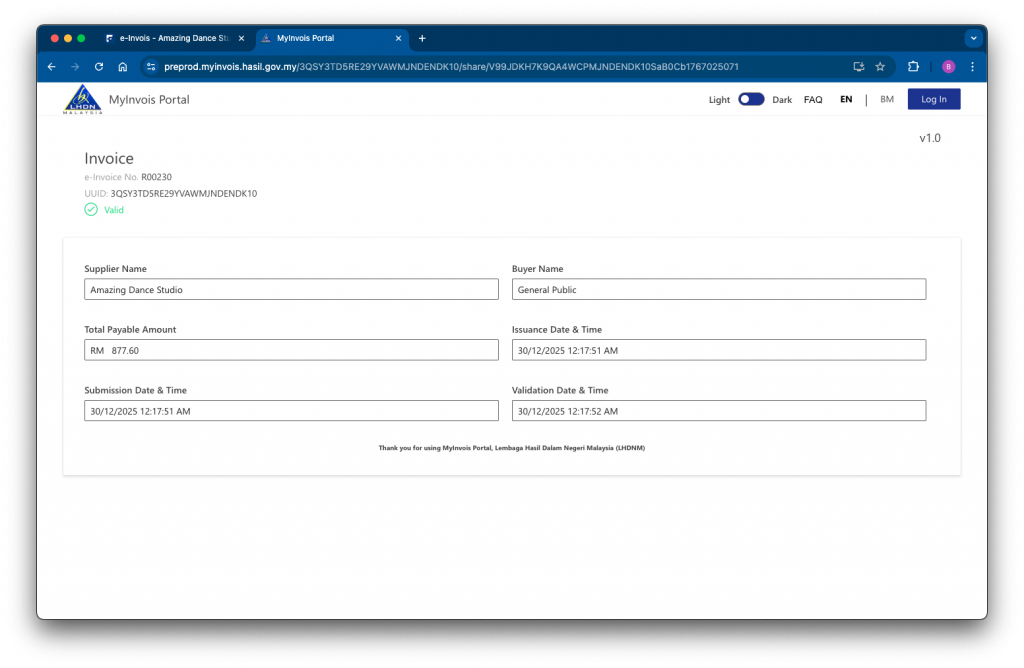
Once your consolidated e‑Invoice is created and validated, it will appear in the list for the selected month. You can click the row to view the full details, including the validation timestamp, UUID, and summary of all included invoices.
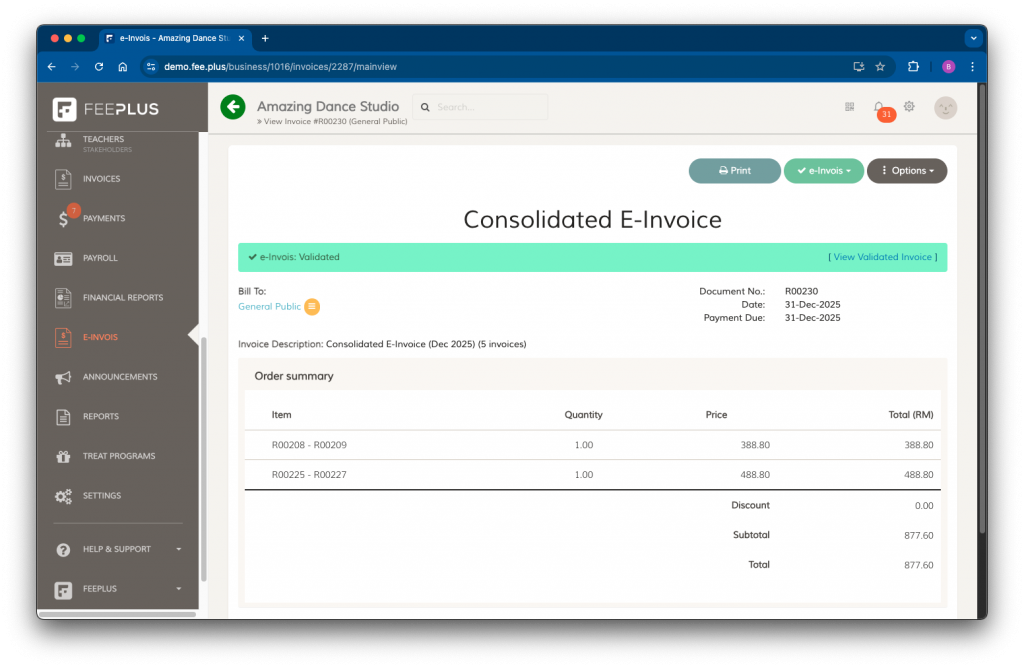
If you need to review the validated document in LHDN’s MyInvois Portal, click View Validated Invoice. This will open the consolidated e‑Invoice directly in MyInvois for further reference and confirmed that the consolidated e-Invoice has been successfully validated.
🛠️ Troubleshooting
Here are common issues you may encounter when consolidating invoices and how to resolve them:
1. The “Consolidate Invoices” button is missing
- Consolidation is not enabled for the invoice group.
- → Go to Settings and enable Consolidate Invoices for that group.
2. Some invoices are not appearing in the list
- The invoice may already be validated.
- The invoice may belong to a different invoice group or month.
- The invoice may require individual validation (e.g., buyer requested an e‑Invoice).
3. The consolidated e‑Invoice is stuck in “Processing”
- Consolidated e‑Invoices require more computation.
- Wait for the automatic refresh.
- If it remains stuck for more than a few minutes, contact FeePlus Support.
4. I accidentally included an invoice that should not be consolidated
- Consolidated e‑Invoices cannot be edited once validated.
- You must cancel the consolidated e‑Invoice and regenerate it correctly.
5. The validation failed
Common reasons include:
- Missing seller information
- Invalid seller TIN number
- Intermediary connection failed
Correct the issue in the settings, then re-submit the consolidated e‑Invoice for validation.