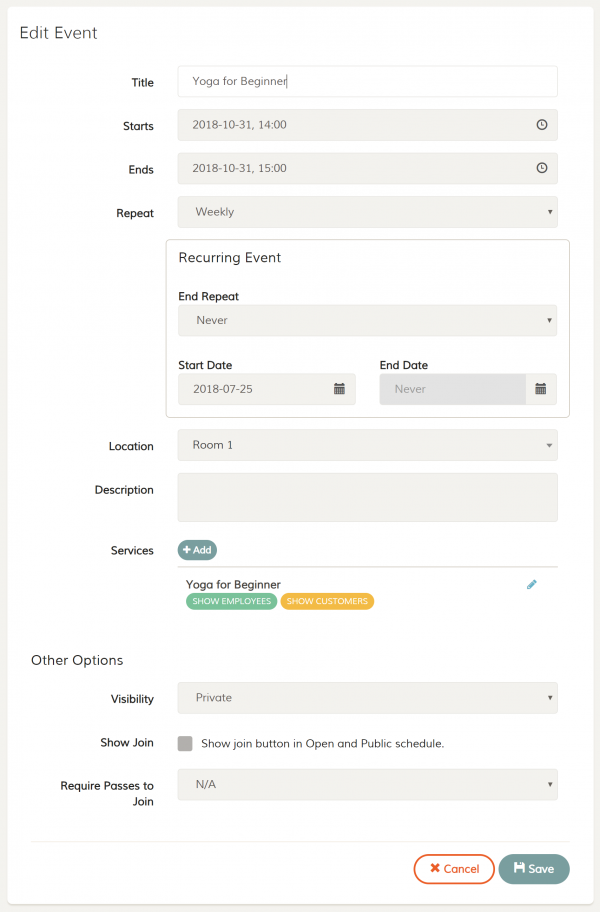
Editing an event for a non-repeatable event is very straight forward. You just need to open the Event, click on the 3-dots menu, select Edit Event menu and the Edit Event screen will show up. Click “Save” button to save your changes.
However, for recurring event, it is different. You can chose to edit the current instance only, for all future instances, or the event’s master records. Fee Plus will prompt you accordingly base on the information you changed:
- Changing starts and ends time
- Changing event’s location only
- Changing event recurring pattern from Weekly to Never
- Changing event recurring’s start date or end date
Changing Starts and Ends Time
When you change only the stars and ends time and click “Save” button, Fee Plus will detect it and prompt you the following:

Reschedule this instance only
Often, you just want to reschedule an event instance for this week only, let’s say from Tuesday to Wednesday, or from 4pm to 6pm. You can do it directly by selecting “Reschedule” menu in the Event Menu.
Alternatively, you can also do it in the Edit Event screen. To do it, just select Reschedule this instance only right after you change the starts and ends time and click “Save” button. Fee Plus will only reschedule the current instance, showing it in your calendar and notified the related participants about this changes.
Reschedule for all future instances
There is a times when there is a changes in your schedules planning. You would like to maintain the event as active but to reschedule the event for all the future instances from the selected event.
You don’t need to set the end date for the selected event and create a new one with the same title, location and other relevant information. You just need to change the starts and ends time for the selected event and select the Reschedule for all future instances in the prompt box. Fee Plus will do all the dirty works for you behind the scene and your new event will be reflected in your calendar automatically.
Update event’s master details
In some cases, you would like to make changes to all the event’s instances, maybe you just created an event and found out you make a mistake in the event’s time. Select this option – Update event’s master details in the prompt box and the event’s master record will be updated.
Note that if there are any instances created previously because you had added participants or make changes to the events, you will not able to update the event’s master details. You need to delete all of the selected event instances to be able to makes changes to the master record.
Changing Event’s Location Only
When you change only the location and click “Save” button, Fee Plus will detect it and prompt you the following:
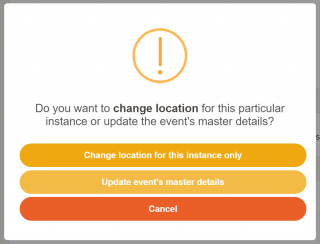
Change location for this instance only
Often, you just want to change location of an event instance for this week only, let’s say from Room A (smaller) to Room B (bigger) due to a bigger group of participants joining for the event. You can do it directly by selecting “Change Location” menu in the Event Menu.
Alternatively, you can also do it in the Edit Event screen. To do it, just select Change location for this instance only right after you change the location and click “Save” button. Fee Plus will only change the location for the current instance, showing it in your calendar and notified the related participants about this changes.
Update event’s instance details
In some cases, you would like to change the location for all the event’s instances, maybe you just created an event and found out you make a mistake in the event’s location. Select this option – Update event’s master details in the prompt box and the event’s master record will be updated.
Sometimes, you would like to change the location after some times of using it in the event, probably due to the current location is not available anymore or you have a bigger participants. You can still update the event’s master details and the location for future instances will changed. However if you have created instances for the past events (like adding participants or make changes to the event), the old location will remain in it.
Changing Event Recurring Pattern from Weekly to Never
Usually, when you set an event as recurring, you will not change it. However, there is some instance that you would want to reset the recurring pattern to Never.
Maybe you made a mistake when you initially created the event. You can change it as long as there is no instances created with the selected event.
Let’s say the event has been created quite some times ago, and there are some instances created with the event, you will not be able to reset the recurring pattern. What you can do is to set the recurring end date and stop the event from showing up after the end date.
Changing Event Recurring’s Start Date or End Date
Changing Recurring’s Start Date
Changing To A Later Date – when changing recurring’s start date to a later, Fee Plus will check if there is any event instances created in between the previous date to the new date, if there exist, you cannot change the date.
Changing To A Prior Date – when changing the start date to a date before, there will be no problem with the system and there will be event instances showing up from the new start date that you have just change.
Changing Recurring’s End Date
There will be a time when you need to stop event instance to showing up in the calendar. You can set it in the recurring’s end date. Select On Date in End Repeat drop down list, and select the end date in the End Date field. Click “Save” button to save the changes.
Note that Fee Plus will check for any event instances created after the end date. You will not able to set the end date if there is any event instances created after the end date.